Keebin’ with Kristina: the One with the Hardware-Layered Keyboard
You know (or maybe you didn’t), I get super excited when y’all use the links at the bottom of this round-up we call Keebin’ to communicate with your old pal …read more


You know (or maybe you didn’t), I get super excited when y’all use the links at the bottom of this round-up we call Keebin’ to communicate with your old pal Kristina about your various labors of love. So just remember that.
Case in point: I was typing up this very issue when I heard from [Jay Crutti] and [Marcel Erz]. Both are out there making replacement keyboards for TRS-80s — [Jay] for Models 3 and 4, and [Marcel] for the Model 1. Oooh, I said to myself. This is going at the top.
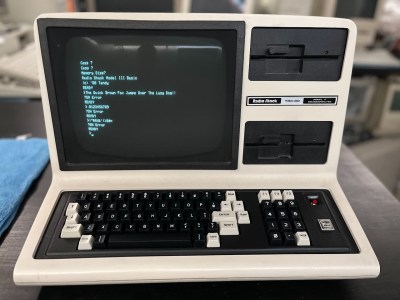
I think the TRS-80 is probably the one I miss the most. If I still had it, you can bet I would be using [Jay] and [Marcel]’s work to build my own replacement keyboard, which the 40-year-old machine would likely need at this point if the Model 4 is any indication with its failing keyboard contacts.
To create the replacements, [Jay] used Keyboard Layout Editor (KLE), Plate & Case Builder, and EasyEDA. Using the schematic from the maintenance manual, he matched the row/column wiring of the original matrix with Cherry MX footprints. Be sure to check out [Jay]’s site for a link to the project files, or to purchase parts or an assembled keyboard. On the hunt for TRS-80 parts in general? Look no further than [Marcel]’s site.
Keyboards On the Molekula Level
While some focus aesthetically on keyboards, or on comfort, [zzeneg] is simultaneously rocking both and coming up with new keyboard frameworks. Take the open-source Molekula for example.
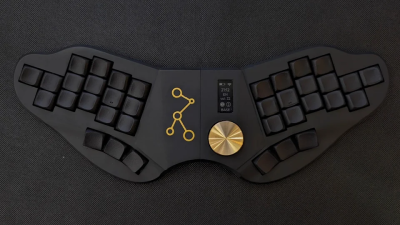
The big idea with molekula and future keyboards is to have dumb sides and a smart central module that does the braining and the hosting. Additionally, [zzeneg]’s plan is to keep the central PCBs’ footprint under 100 mm² in order to make it more affordable for experimentation. You can see this in the third photo of the gallery.
There are a couple of cool things going on in addition to the modularity — the switch footprints cover pretty much anything you’d want to use, and [zzeneg] left the hot swap sockets exposed around back. This thing is just cool through and through.
Via reddit
The Centerfold: Alice, 1989 Style
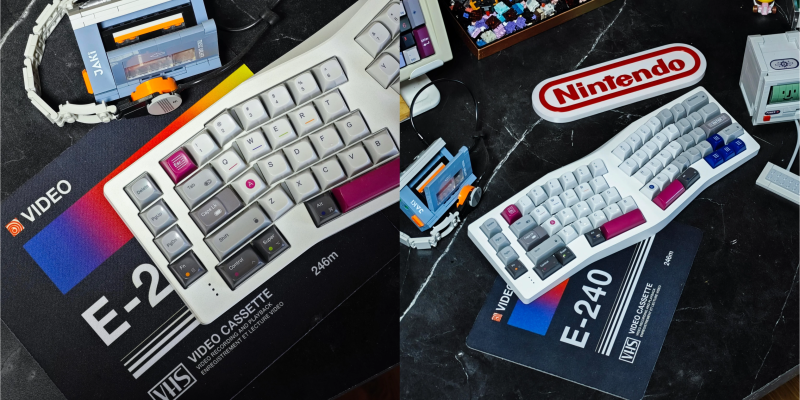
Do you rock a sweet set of peripherals on a screamin’ desk pad? Send me a picture along with your handle and all the gory details, and you could be featured here!
Historical Clackers: the Chicago No. 3
At first glance, the Chicago No. 3 looks a bit like a car that’s missing a bumper. But then you look again and see it sitting on round feet firmly planted behind the frame-less keyboard and think, it might be kind of nice to type on this one. And without that extra iron, it’s probably pretty light and portable, too.
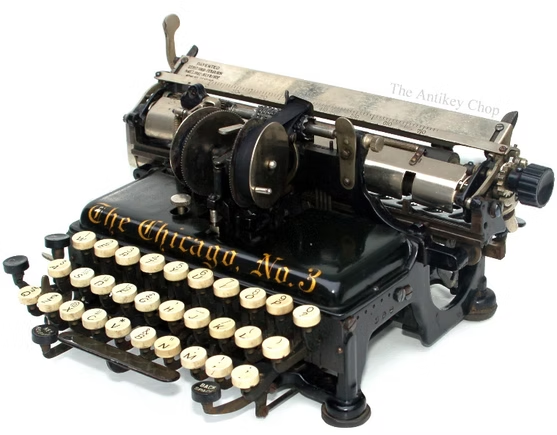
Given all of that, the No. 3 does have an interesting WERTY layout, with the ‘Q’ appearing on the bottom row. So did the model that sold concurrently, the No. 1 (which did have a frame around the keyboard). The base of the No. 3 was slotted, which made it even lighter to carry around.
Additionally, the two models had different ribbon mechanisms. The No. 3 used a 3/8″ ribbon that fed through those vertically-oriented spools, which is something I haven’t seen before. The No. 3 had two additional keys — a Backspace and a Margin Release. Whereas the No. 1 cost $35, the No. 3 went for $50 in early 1900s money (about $1,600 today).
Functionally speaking, the two were quite similar. In addition to both having a WERTY keyboard, they each used a typesleeve — a cylindrical component that can be swapped out, much like the IBM Selectric’s golf ball type element — and a hammer to print. Interestingly enough, in order to use either model, the typist had to turn the safety off by pulling a “hammer extension arm” on the left side before typing. Hopefully, nothing terrible happened if you forgot to do this.
And What Do We Think of Hardware Layers?
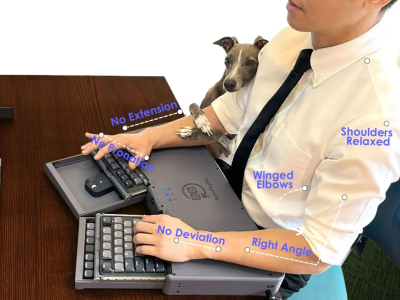
Wow. This might actually be a good use of image recognition; I am undecided. It certainly looks cool at first blush, anyway. And I hope it makes a little zhoop! sound in the process of working.
Okay, so, imagine you’re sitting there at your split keyboard and need to mouse or enter some digits real fast. With this number, all you have to do is stretch out your fingers for a second and whoosh — the QWERTY retracts, and in its place comes a 10-key on the left and a mouse on the right.
That’s the power of AutoKeybo. Here, watch the demo video. It’s only nine seconds long.
So, let’s start with the obvious. This is supposed to be an ergonomic keyboard, given that you don’t have to move your hand over to mouse. But you do have to rest your arms on a big plastic box that’s two keyboards tall, and that probably isn’t good for you. But it is split, and the sides are angled toward one another, so there’s that.
The cool part is that the trays move independently, so you just stretch out whichever hand is hiding what you need to use real quick. It would be nice to access the mouse without losing the left half of the keyboard. Don’t ask me why, it just would. Just so you wouldn’t have to move both hands.
Okay, so how does it work already? Basically, there’s a built-in camera that detects the splaying of your fingers to trigger the switch. It has a Raspberry Pi 5 doing all of the crunching, which of course you could use as a standalone computer. Here’s a report from someone else who tried it out at CES.
Got a hot tip that has like, anything to do with keyboards? Help me out by sending in a link or two. Don’t want all the Hackaday scribes to see it? Feel free to email me directly.
What's Your Reaction?


